Recently i felt that streamyx broadband very slow,lag and always disconnect with the server.
I think lots of streamyx user also face this problem right?How come will be like that?
OK.Let me show you all some screen shot.
Mostly of streamyx user online,their connection also will auto connect to streamyx DNS server.
Below is the streamyx DNS server that mostly of streamyx user also will auto connect to.
Streamyx DNS server :
- 202.188.0.132
- 202.188.0.133
- 202.188.1.4
- 202.188.1.5
And now i will take 1 of the DNS server above to take a test on it.
The DNS server i test is 202.188.0.132 and below is the result.
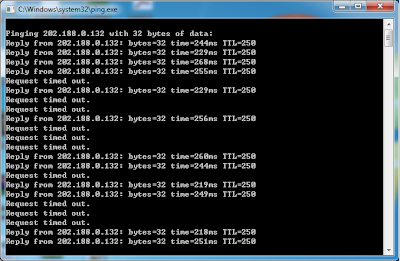
Request timed out =
disconnected /offline
Reply from 202.188.0.132 = connected / online
Within 22 second i test on streamyx DNS server (202.188.0.132) got 10 second is disconnected /offline one.
I think now you all will understand why the streamyx broadba nd so slow,lag and always disconnect.
And now i wanna show you all 1 of the google DNS server ping screen shot.
Below is the google DNS server ping screen shot.
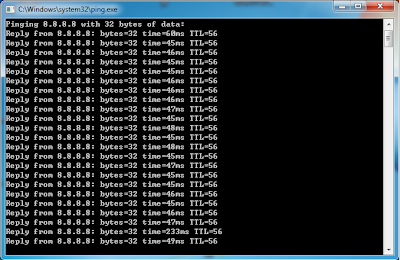
Above screen shot show that the google DNS server is more stable,more faster and connected every second.
So now i will show you all how to exchange your connected DNS server IP.
Step 1 :
Start > search for "
view network connections" >
Enter Step 2
 :
Right click on the connection you connected now >
Properties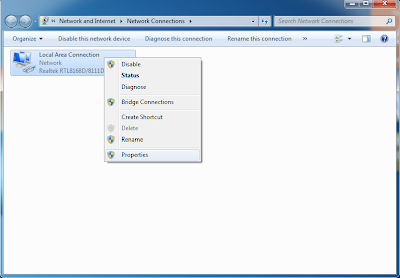
Step 3 :
Double click "
Internet Protocol Version 4 (TCP/IPv4) "
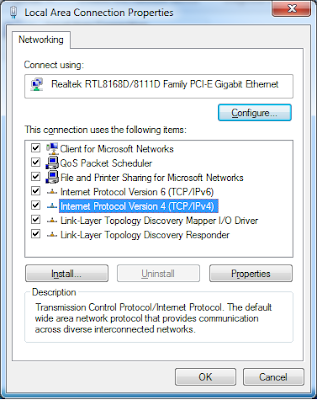
Step 4 : Choose "
Use the following DNS server addresses : "
- Preferred DNS server : 8.8.8.8
- Alternate DNS server : 8.8.4.4
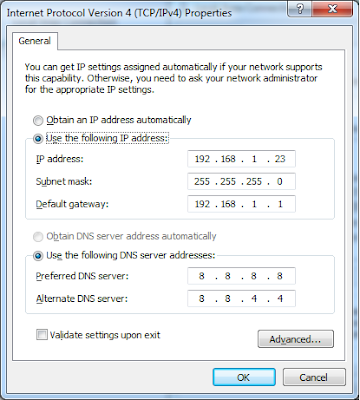
At last click "
OK"
Have a try and happy online-ing.
Below is some free Public DNS server IP.
Free Public DNS Server
=> Service provider: Google
Google public dns server IP address:
=> Service provider:Dnsadvantage
Dnsadvantage free dns server list:
=> Service provider:OpenDNS
OpenDNS free dns server list / IP address:
- 208.67.222.222
- 208.67.220.220
=> Service provider:Norton
Norton free dns server list / IP address:
- 198.153.192.1
- 198.153.194.1
=> Service provider: GTEI DNS (now Verizon)
Public Name server IP address:
- 4.2.2.1
- 4.2.2.2
- 4.2.2.3
- 4.2.2.4
- 4.2.2.5
- 4.2.2.6
=> Service provider: ScrubIt
Public dns server address:
- 67.138.54.100
- 207.225.209.66


